Create filters to manage ticket requests based on your business processes.
Each filter has different conditions depending on its purpose.
1. How to Add a Filter:
Go to the left-hand menu, select “Business rules”, then click “Ticket view”. You’ll first see a list of existing Ticket views in the system. You can use them as they are, modify them, or delete them based on your needs.
- The interface of function “Ticket Views” includes:

(1) Sort by Position: Sort and display the list of views by optional position or display the views by creation/ update time.
(2) All shared views: Show all view lists or show filter lists that are authorized for a specific group.
(3) Shared: Show the list of shared views or personal views.
(4) Create a new “Ticket Views”
(5) Search box Ticket view by name
(6) Ticket views actived
(7) Ticket views inactived
(8) Other functions are displayed when hovering over each views: Activate/Deactivate, Copy, Edit, Delete
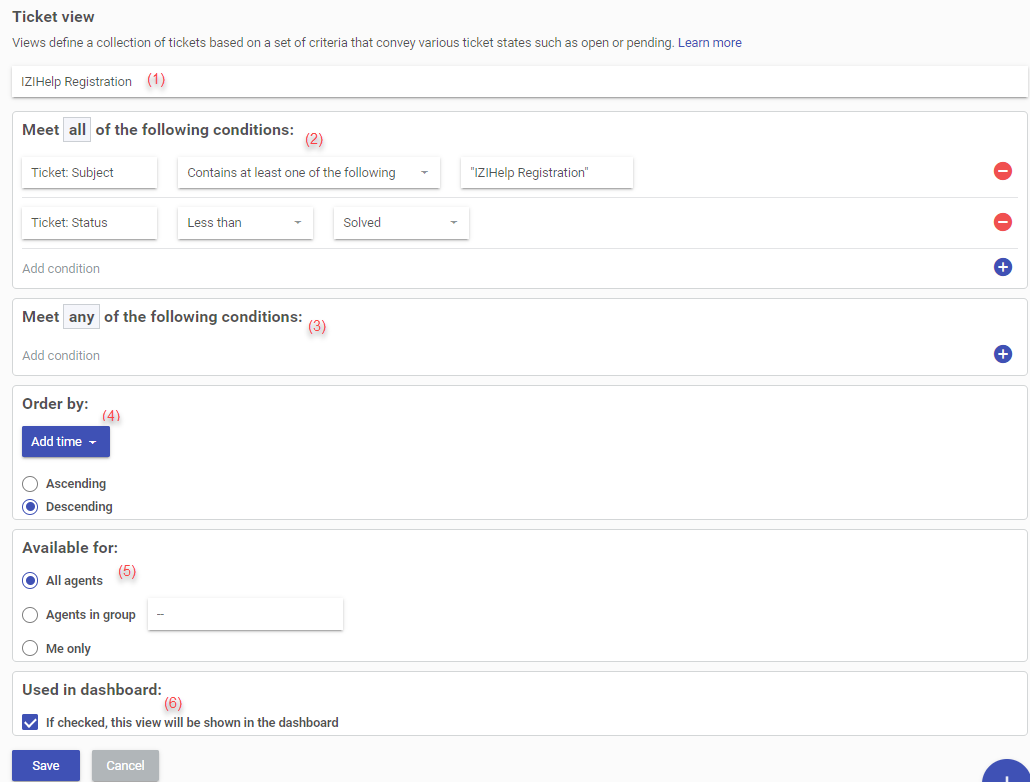
- Interface of the detailed conditions in a Ticket View.

(1) Ticket view name
(2) Condition “All” : Tickets having information that satisfies all the conditions in this field will be displayed when viewing the results of the view.
(3) Condition “Any”: Tickets having information that satisfies one of the conditions in this field and all the conditions in field (2) will be displayed when viewing the results of the view.
(4) Sort the display results when viewing the filter results: There are 2 ways to sort:
- Sort by tickets creation time in ascending or descending order.
- Sort by tickets update time in ascending or descending order.
(5) Available for: Assign permissions to the selected object.
- Assign to All agents: All staff have the right to view the results of the filter in the Menu, but only admin rights can edit.
- Assign to Agents in group: Only agents in the selected group have the right to view the results of the filter in the Menu, only admin and supervisor rights to manage the selected group can edit.
- Assign to Only me: Only the creator/ editor who transferred to personal rights have the right to view the results of the filter in the Menu and edit.
(6) Used in Dashboard: Allow the results of the filter to display on the Dashboard.
2. Display interface when viewing the results of the views.
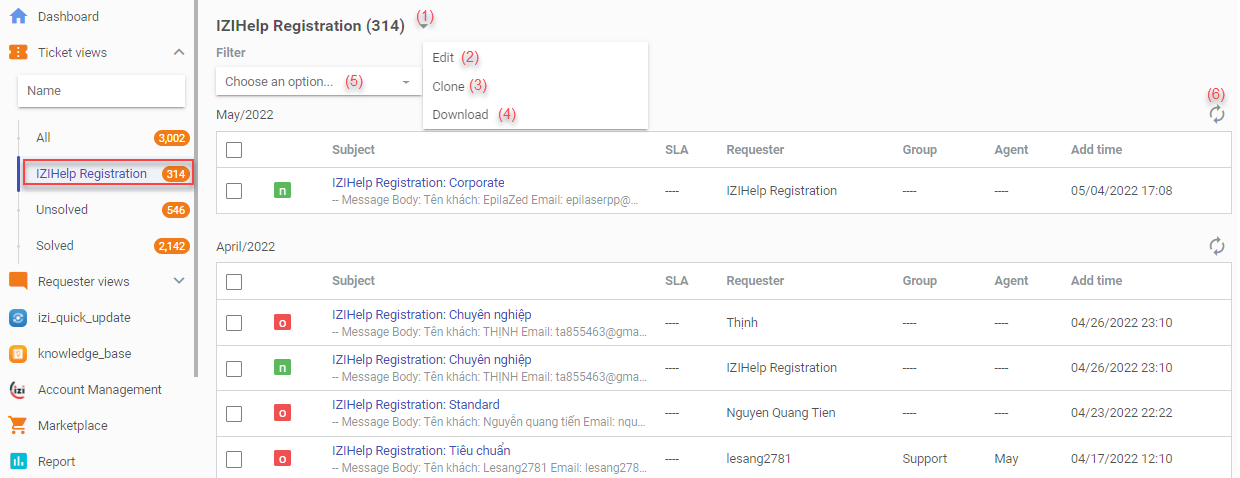
Go to Menu, select Ticket views and select the view you want to show. The interface of “Ticket Views” result includes:

(1) View options
(2) Edit: Edit view details including name, conditions, assignment and display information
(3) Clone: Clone a view including name, conditions, assignment and display information. The copied view has the suffix “_clone” in the name
(4) Download: Download data as excel file
(5) Filter by custom time
(6) Button ‘Refesh’: Refresh and update new data in the Ticket view
